
How to Monitor Email Systems
CheckTLS.com is a powerful set of email and Internet Protocol tools. The tools can do a lot, but getting started can be overwhelming (see How to Use CheckTLS).
HIPAA/GDPR Compliance
Regulations like HIPAA, GDPR, CCPA, PCI DSS, Sarbanes-Oxley, GLBA, SB1386, SEC 17a-4, NASD3010, FRCP, FINRA, etc. require an email containing Protected Information (PI) to be encrypted when sent over the Internet. Your current email system likely does Transport Layer Security (TLS), which is sufficient for these regulations. You can test both sides (sending and receiving) of your email system with our and tests.
All You Need is CheckTLS
So, to be Compliant, all you have to do is make sure that TLS keeps working. CheckTLS.com can do that for you by monitoring your email.
This how-to shows step-by-step how to setup Verified TLS℠ to monitor your email system and make sure it keeps using TLS. For your convenience, each step is on a colored line below with a checkbox at the front, like this:
- Subscribe to CheckTLS
Monitoring requires a Corporate Subscription to CheckTLS, which costs $25 to try for 30 days. Working through this how-to will take less than an hour. So, for $25, an hour of your time, and no changes to your email system, you can have Verified TLS℠ working on your email system. This is the production version of Verified TLS℠, so if you like it, keep it! We offer free support because we are confident this is the best way to make your email Compliant.
We will setup two tests
One will test your own email, and one will test your customers' email. The tests will send an email if they find something wrong. See Results Format below for more information. We will then schedule the tests to run once a day. As long as you respond to any failures, you can be sure your email is secure and stays secure. And that's what you need for Compliance.
FailSafe
We realize the possibility that something could prevent our tests from sending a failure email. For stricter HIPAA/GDPR monitoring, we offer FailSafe Monitoring, or you can have CheckTLS send success emails instead of error emails.
Monitoring Your Own Email
This will monitor both your sender and receiver, i.e. how you send and how you receive email. There are three steps to setting up monitoring of your own email system:
- Setup a custom forwarder in your email system.
- Create a test at CheckTLS.
- Schedule the test to run regularly.
Setup a Custom Forwarder in Your Email System
Since we want to test how you both send and receive email, we need your email system to send us an email. We do this by setting up a custom address in your email system that forwards everything it receives to us. That way we get your system to send us an email in response to our system sending you one. We ignore any other email that may hit that email address, so it cannot hurt anything.
Create an email address in your email system (we suggest "CheckTLS-Reply@YourDomain.com") that automatically forwards everything it receives to "ReplyAddress@TestThru.CheckTLS.com". For Office 365, see alias mail. For *nix systems, see the manpage for "aliases", or just add this line to your /etc/aliases file:
CheckTLS-Reply: ReplyAddress@TestThru.CheckTLS.com
Consider adding @CheckTLS.com to your spam whitelist because some test results look like SPAM.
Create a Test at CheckTLS
From any CheckTLS screen, choose :
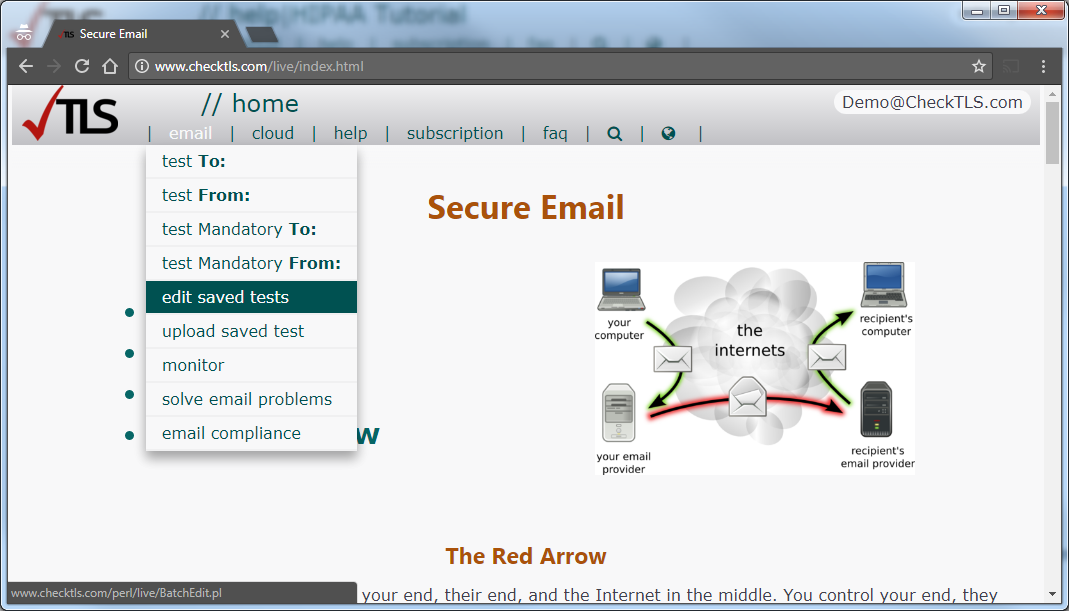
From the screen, choose :

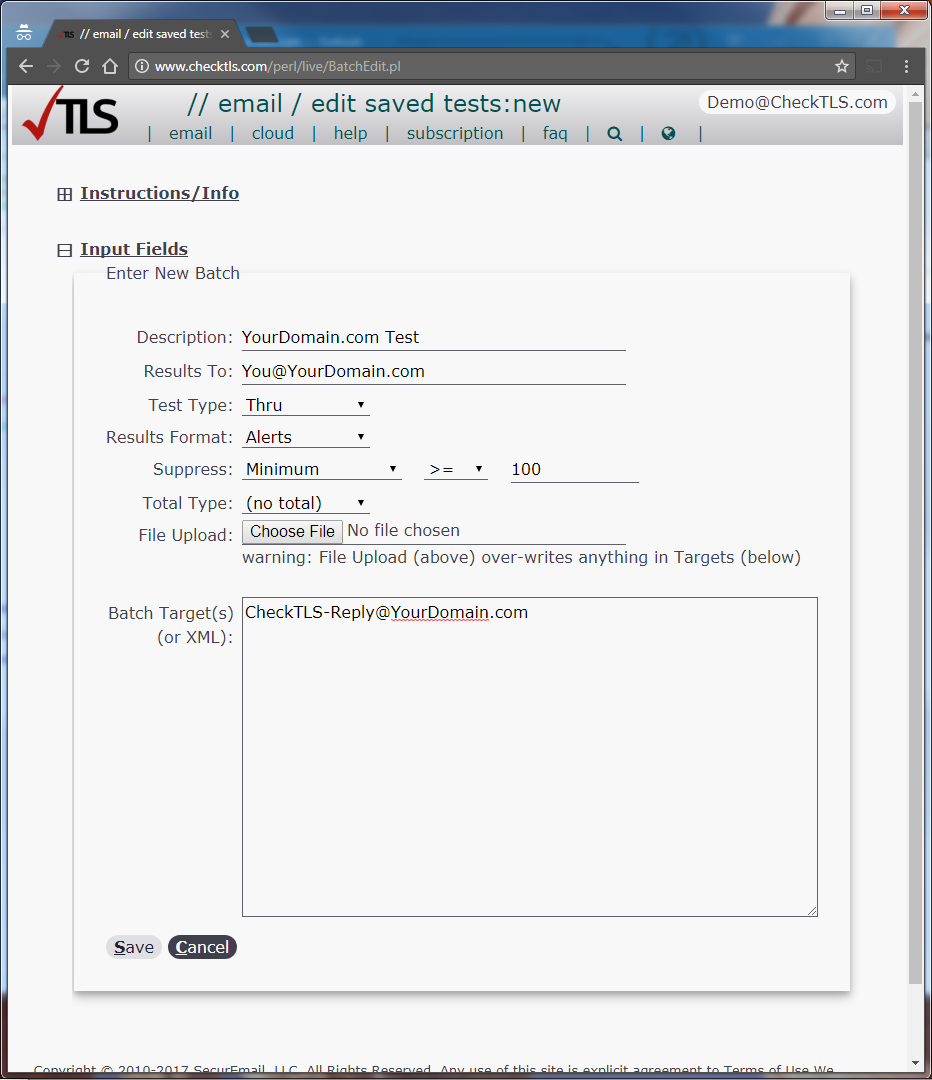
On the screen, enter the fields as below and then choose :
- Description
- Name this test "YourDomain.com Test" (replacing "YourDomain" with your real domain name).
- Results To
- Use your email address to start. Once everything is setup and tested you can change this to a distribution list or some other address that will take quick action if your email system starts to fail.
- Test Type
- This must be "Thru".
- Results Format
- This must be "Alerts".
- Suppress
- This must be "Minimum" and ">=" (i.e. greater than or equal) and "90". If your email scores less than 90 you could adjust this, but we suggest you fix your email instead.
- Total Type
- This must be "(no total") or you will receive duplicate alerts.
- File Upload
- Leave this at "No file chosen". We will use the next field instead.
- Batch Target(s)
- Enter the address of the Custom Forwarder that you setup in step one of this how-to.
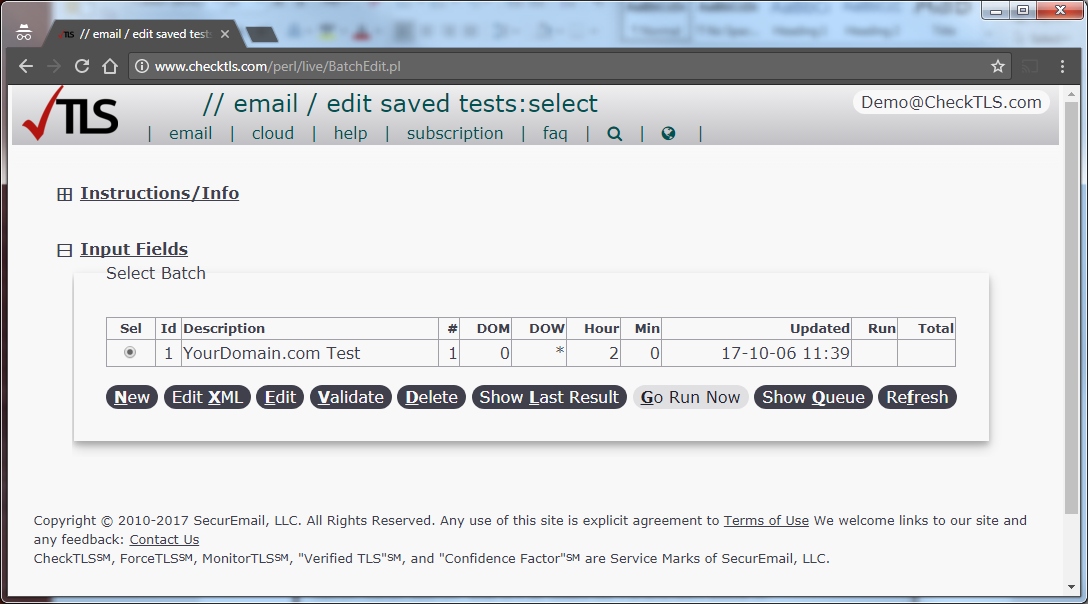
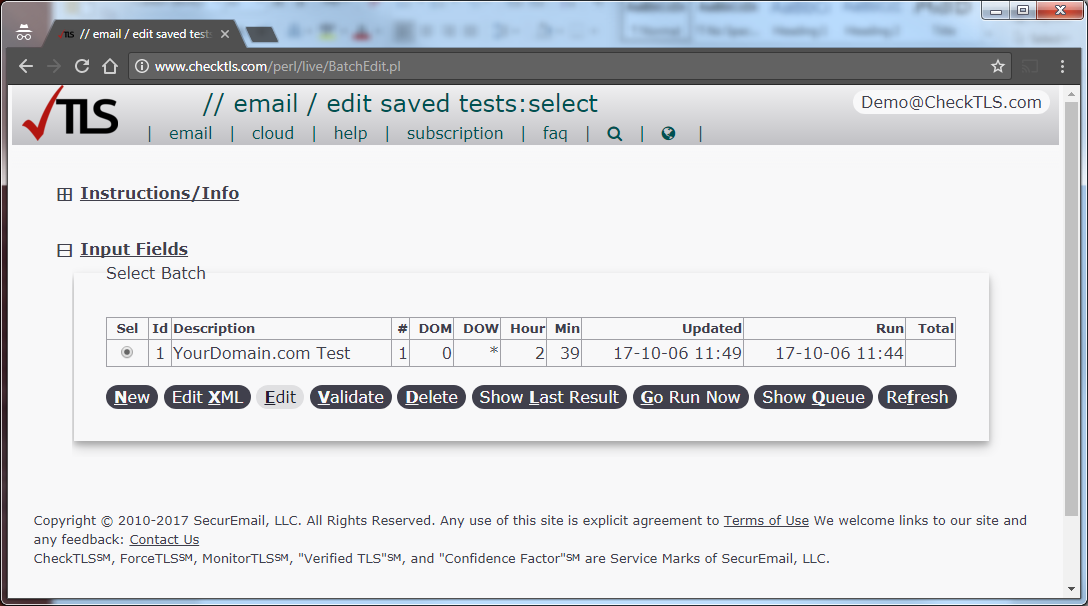
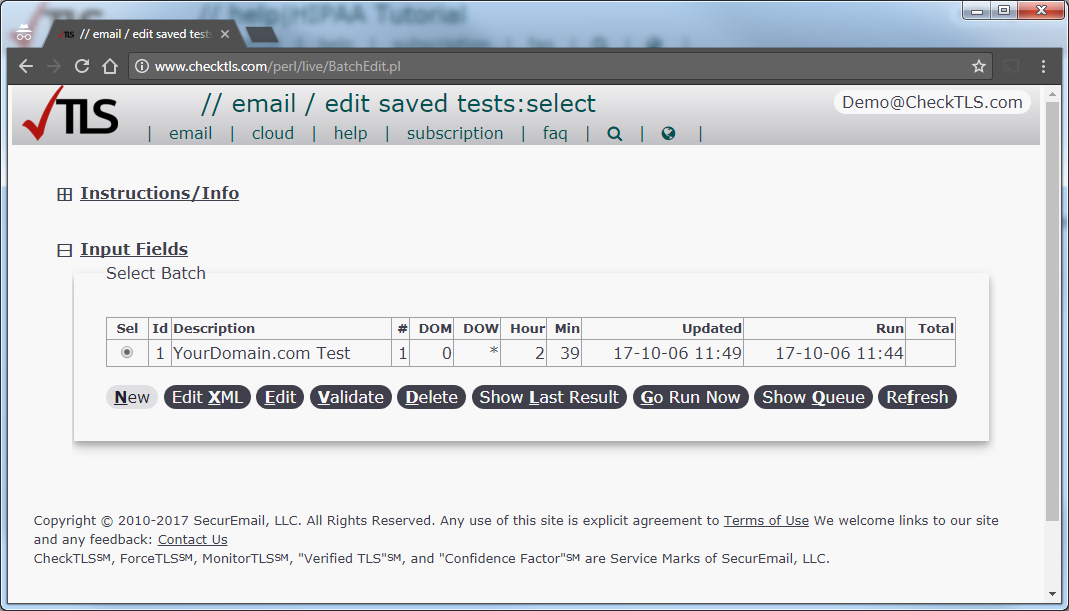
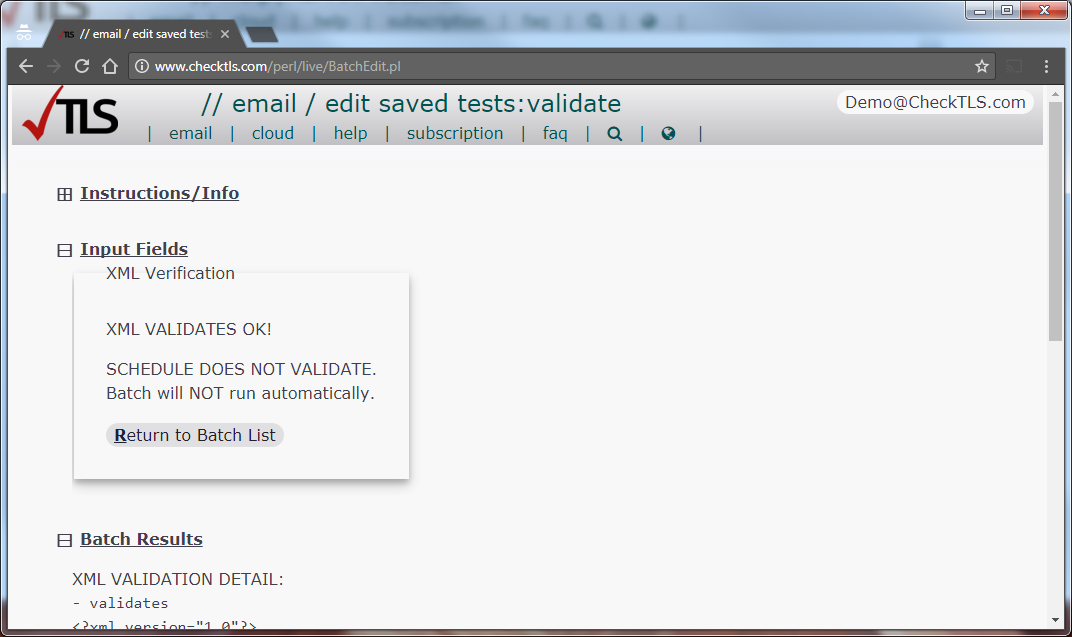
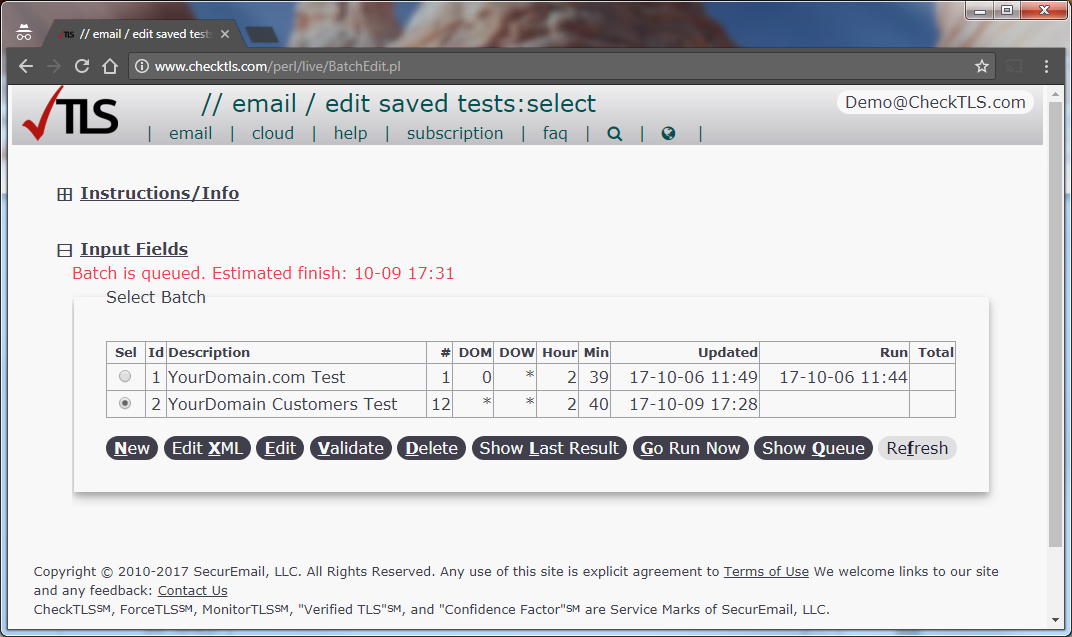
After saving the test you will return to the screen with a message in red that a new test was created. Choose to make sure you created the test correctly:
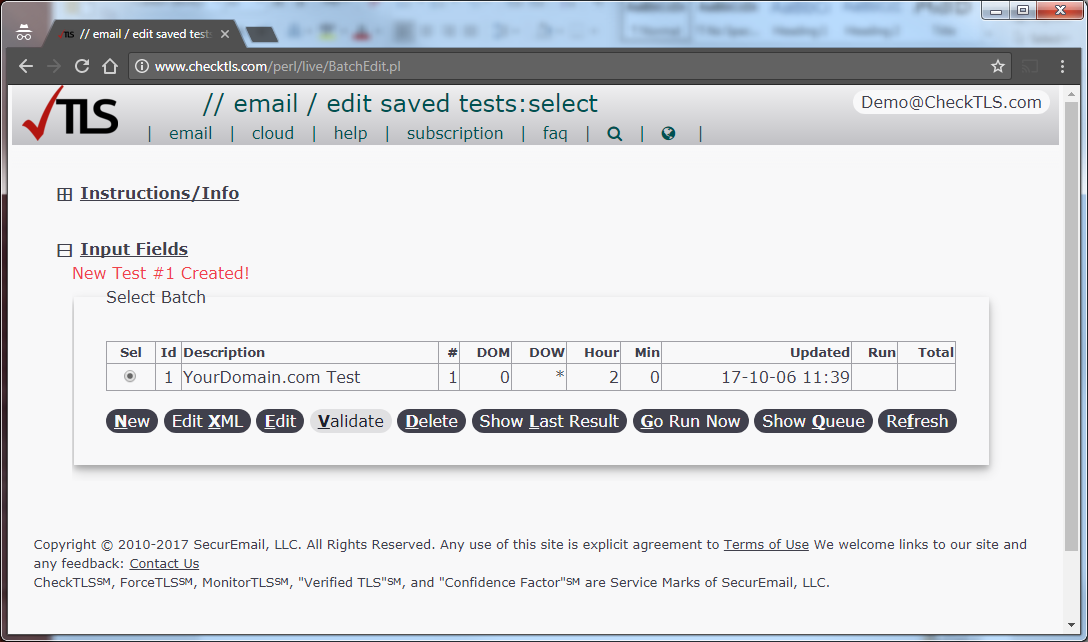
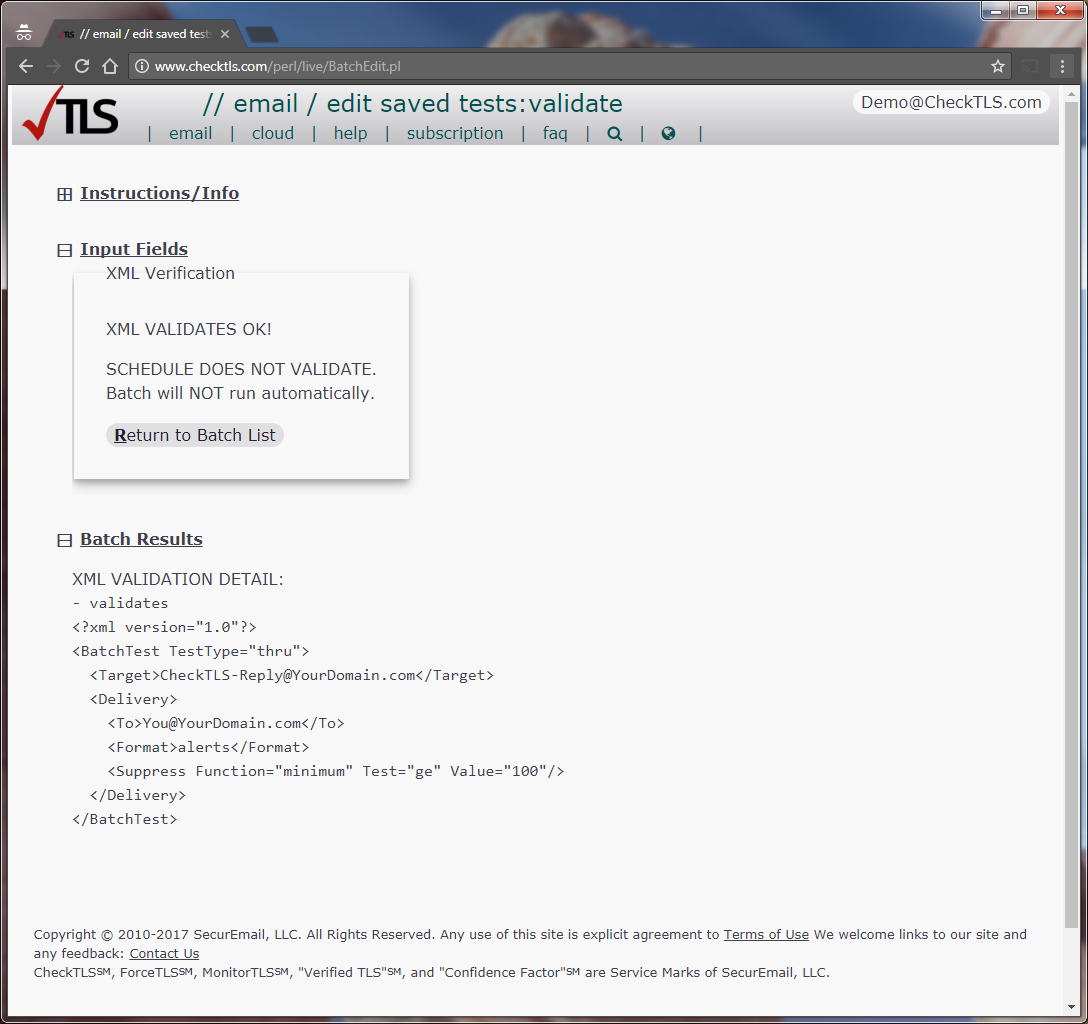
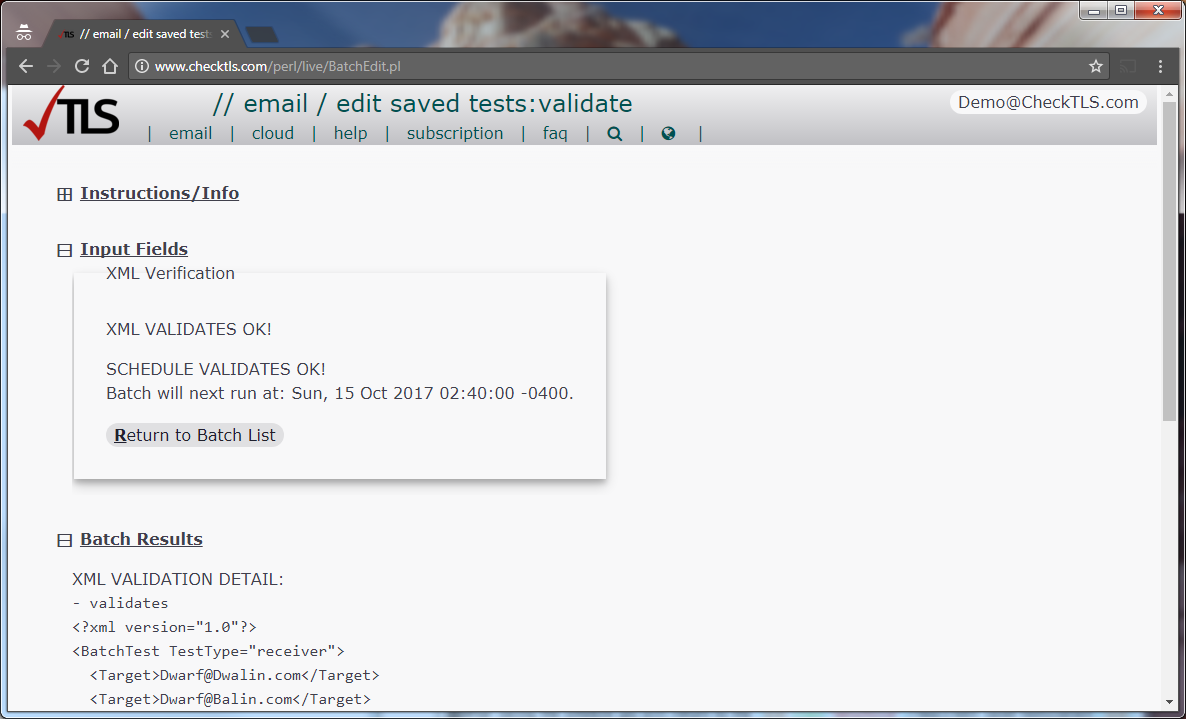
The screen should say "XML VALIDATES OK" as shown below. Don't worry about the "SCHEDULE DOES NOT VALIDATE" message right now. If not, delete the test and start over. See Validation Failed below for more information. Use to continue:
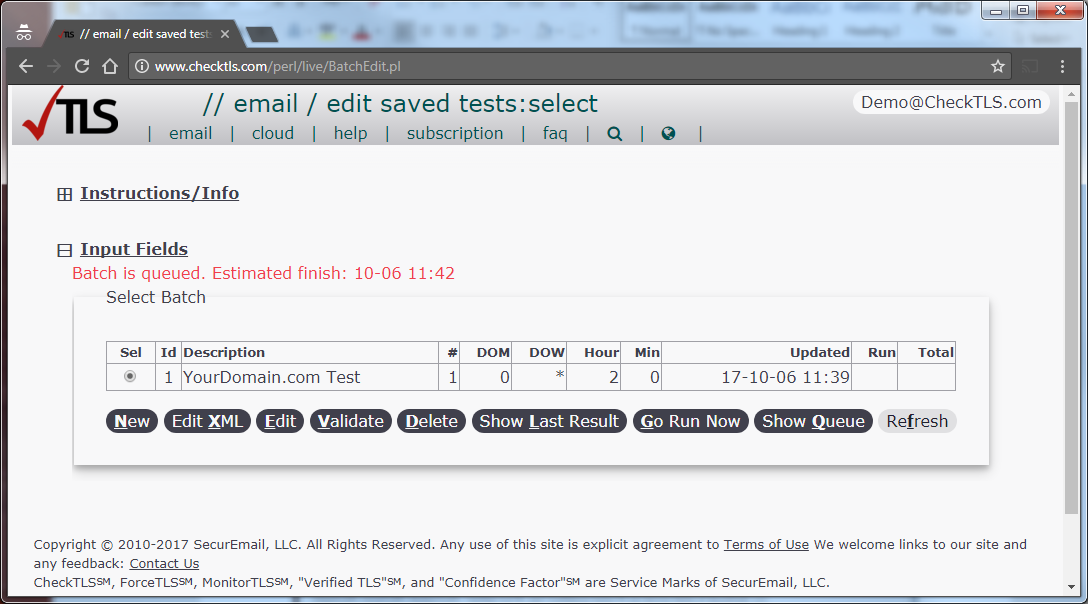
You can now try the test to see if it works. From the screen, choose :
The screen should redisplay with a message in red that your test is queued and when it should finish. Wait a minute or two (depends on how fast your email system forwards the message back to CheckTLS) and choose to see if the test has finished:
The test has finished when the "Run" column (second from the right) changes to show the date/time the test finished. Keep using until the date/time is now (or a minute or two ago). Once the date/time is now, choose to see what happened:
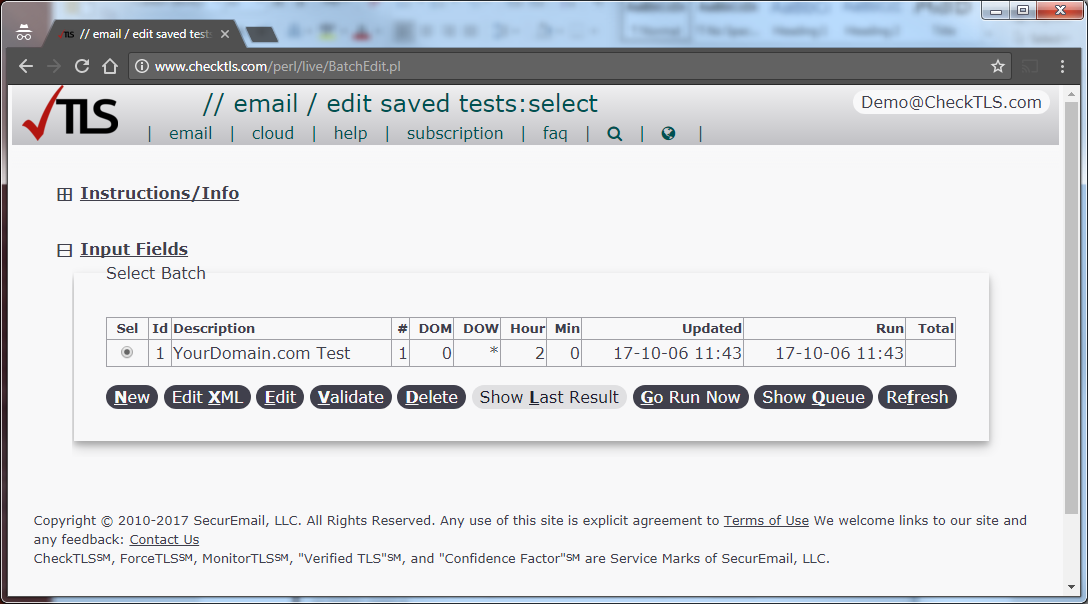
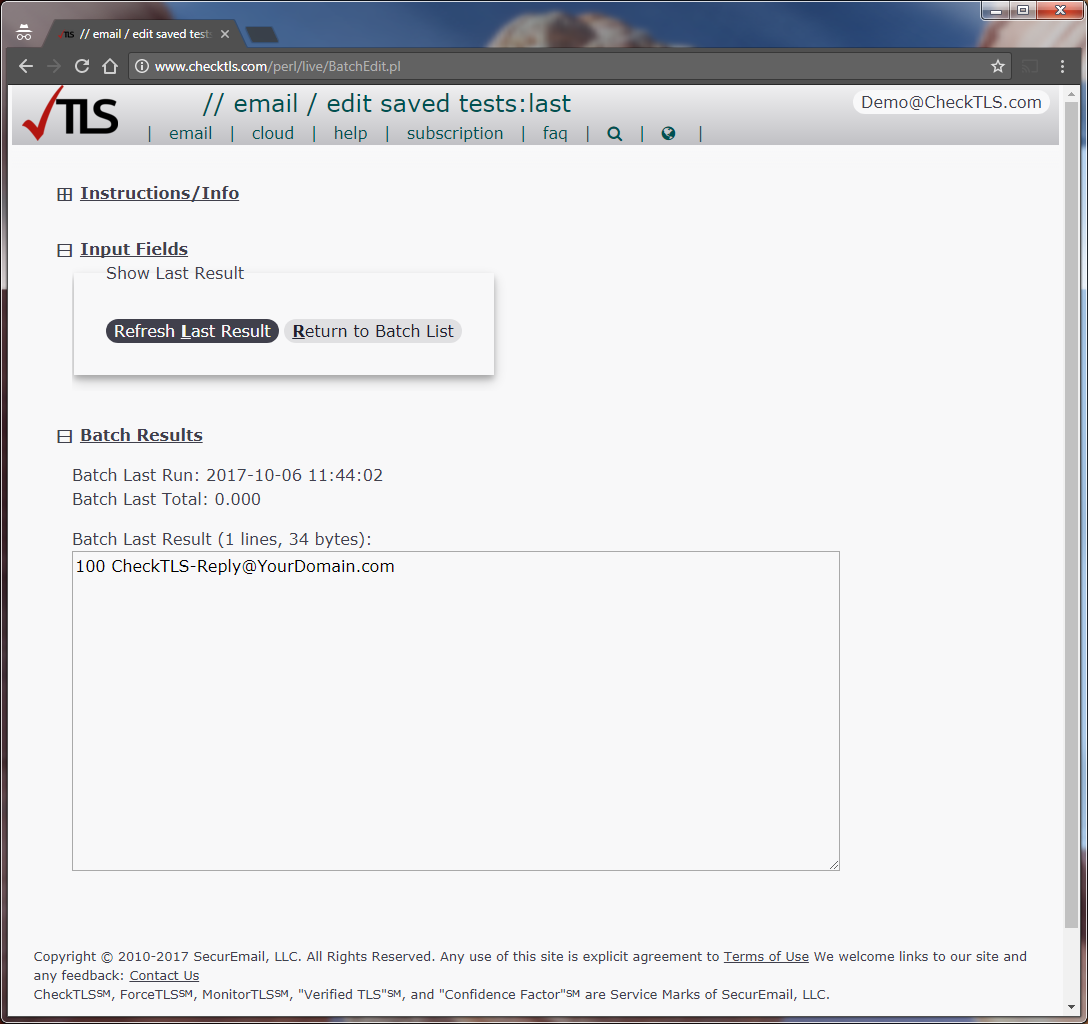
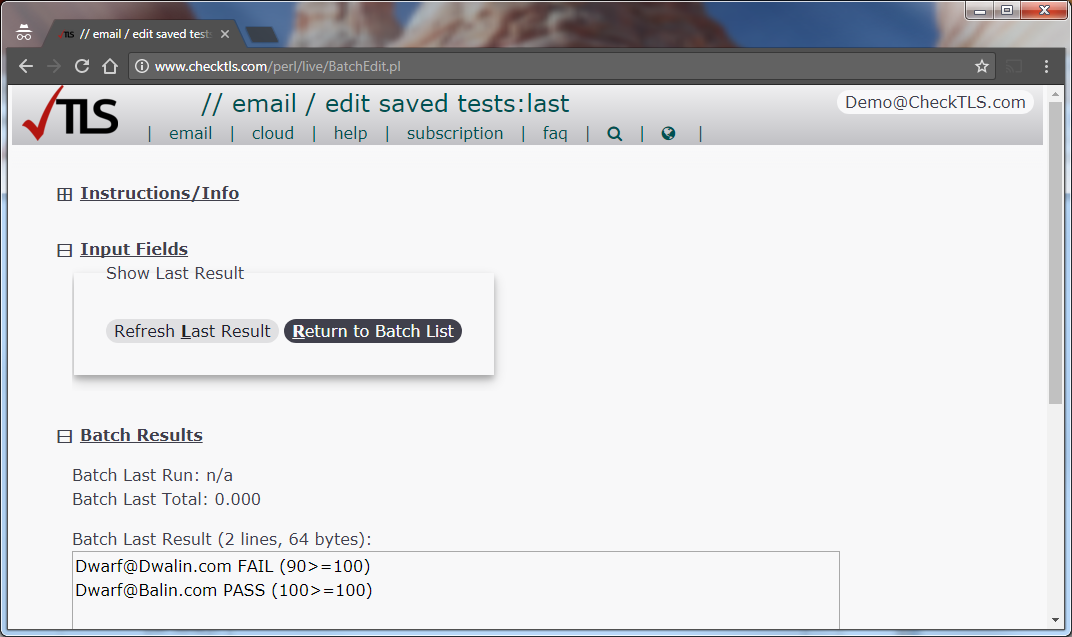
The screen should show info about the last time the test ran. There should be just one line in the "Batch Last Result" section that shows a score (should be 90 or more) and a target (the Custom Forwarder address that you setup in step one of this how-to). If the test takes more than a minute or two and the score eventually is zero, the Custom Forwarder is not working. See Forwarder Failed below for more information. Use to continue:
Schedule the Test to Run Regularly
We suggest testing your own email daily as the steps below indicate. When scheduling a time for your test to run below, we ask you to pick an hour between 1 and 5, and a minute between 1 and 59. Randomizing the test times helps us level the load on our servers, and helps your test to run faster.
From the screen, choose :
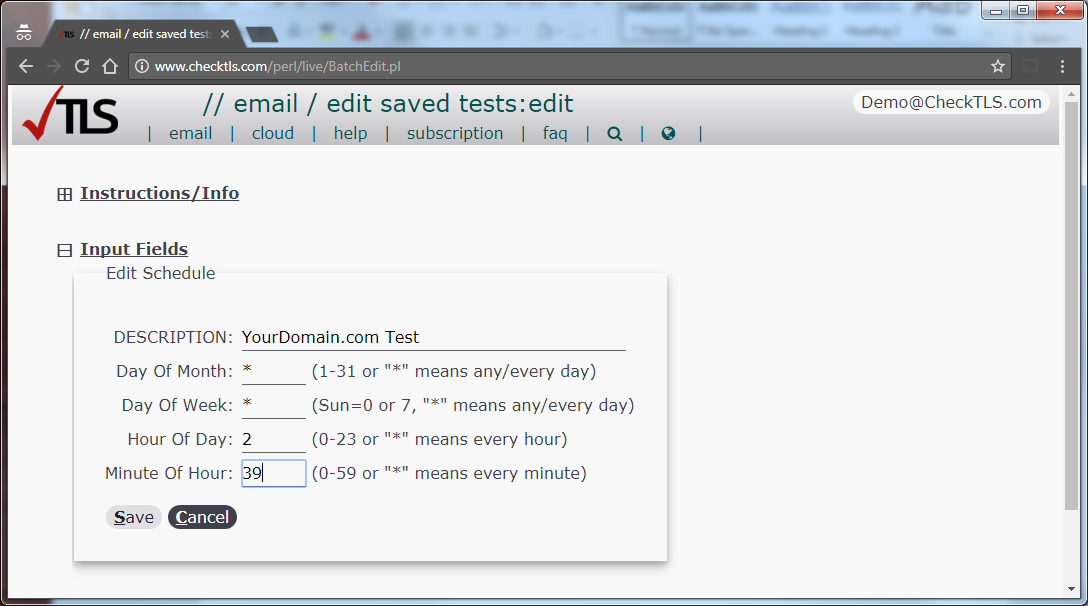
On the screen, enter the fields as below and then choose :
- Description
- Leave this as you entered before.
- Day Of Month
- Change this to an asterisk (meaning run the test every day).
- Day Of Week
- Change this to an asterisk (meaning run the test every day).
- Hour Of Day
- Pick an hour between 1 and 5.
- Minute Of Hour
- Pick a minute between 0 and 59.
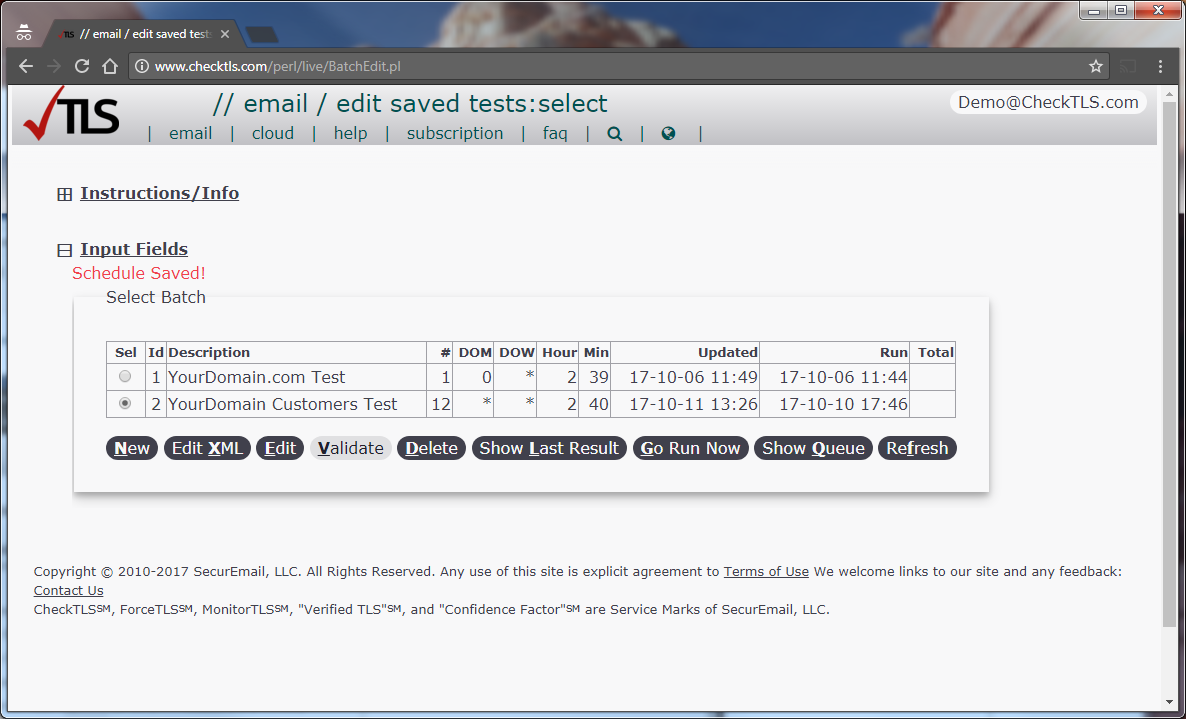
After saving the schedule you will return to the screen with a message in red that the schedule was saved. Choose again to make sure you the test will run when you expect:
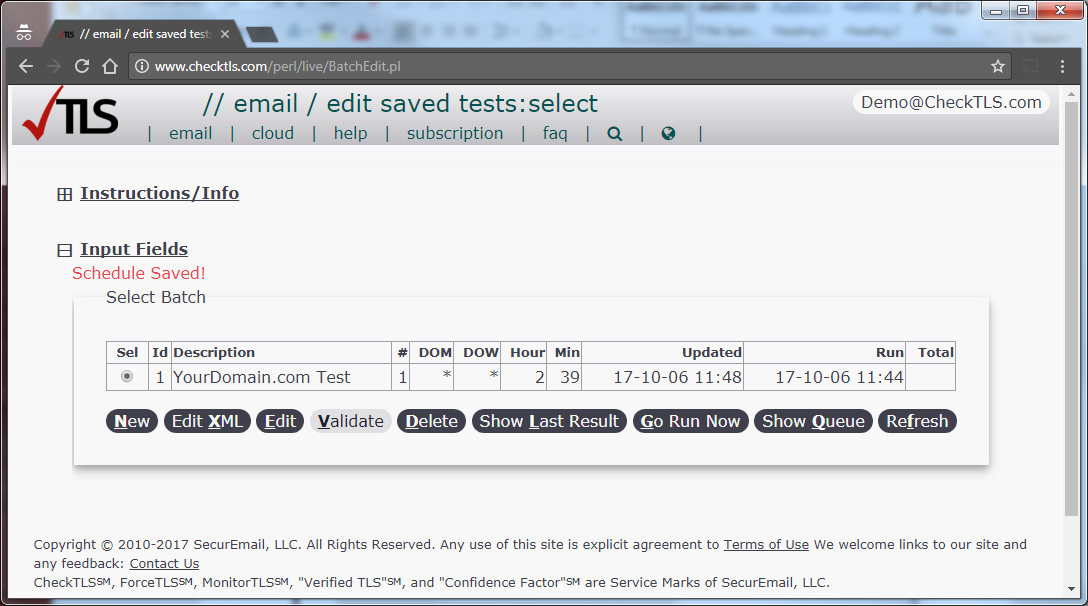
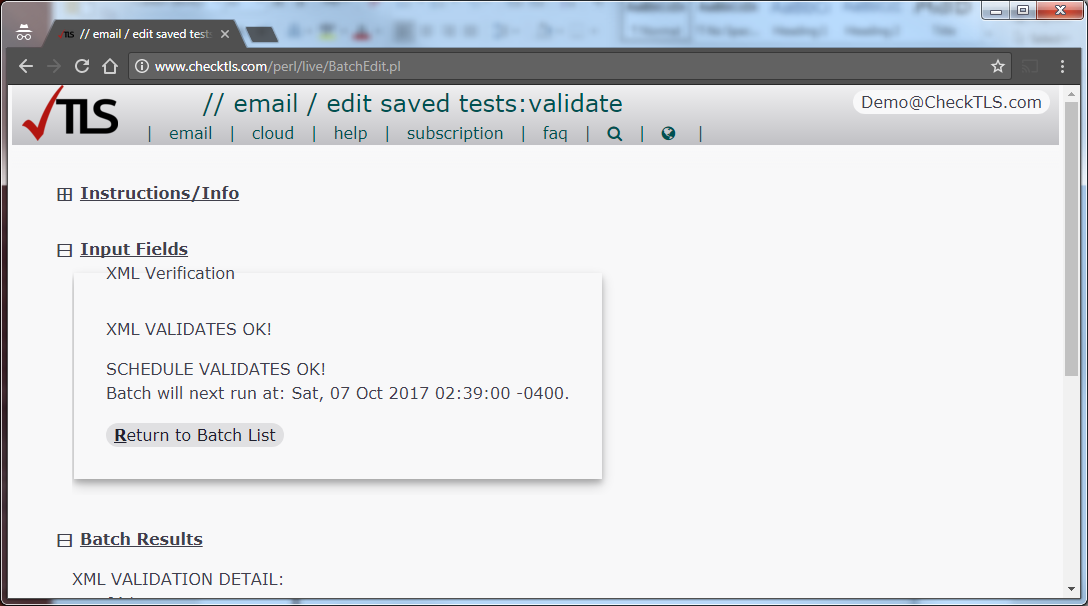
The screen should still say "XML VALIDATES OK", but it should also now say "SCHEDULE VALIDATES OK" as well, and it shows you when the test will next run. Use to continue:
That it. You have created a test of your email system (in and out) and scheduled it to run every day.
Monitoring Your Customers' Email
This second test will monitor how your customers receive email. It is your responsibility to be sure you transmit Protected Information (PI) securely, which means you should refuse to send to someone who does not have working TLS encryption. Monitoring one customer's email is much easier than monitoring your own email (above test), but because you have many customers, keeping the list of targets to test up-to-date is your challenge. The steps to setting up monitoring of your own email system:
- Create a text file list of the email addresses you use.
- Create a Batch Test from the text file.
- Schedule the Batch Test to run regularly.
- Establish a process to keep the Batch updated.
- Periodically audit the Batch Test source and result.
Create a text file list of the email addresses you use
Find a list of the email addresses to which you send Protected Information (PI). Common sources of this list are your address book, a send log on an email server, an export from your CRM system, etc. List the addresses, one per line, in a plain text file, like this:
Dwarf@Dwalin.com
Dwarf@Balin.com
Dwarf@Kili.com
Dwarf@Fili.com
Dwarf@Dori.com
Dwarf@Nori.com
Dwarf@Ori.com
Dwarf@Gloin.com
Dwarf@Bifur.com
Dwarf@Bofur.com
Dwarf@Bombur.com
Dwarf@Thorin.com
Put the file on your PC. We used the name "EMail-List.txt" for the file name.
Create a Batch Test from the text file
From any CheckTLS screen, choose :
From the screen, choose :
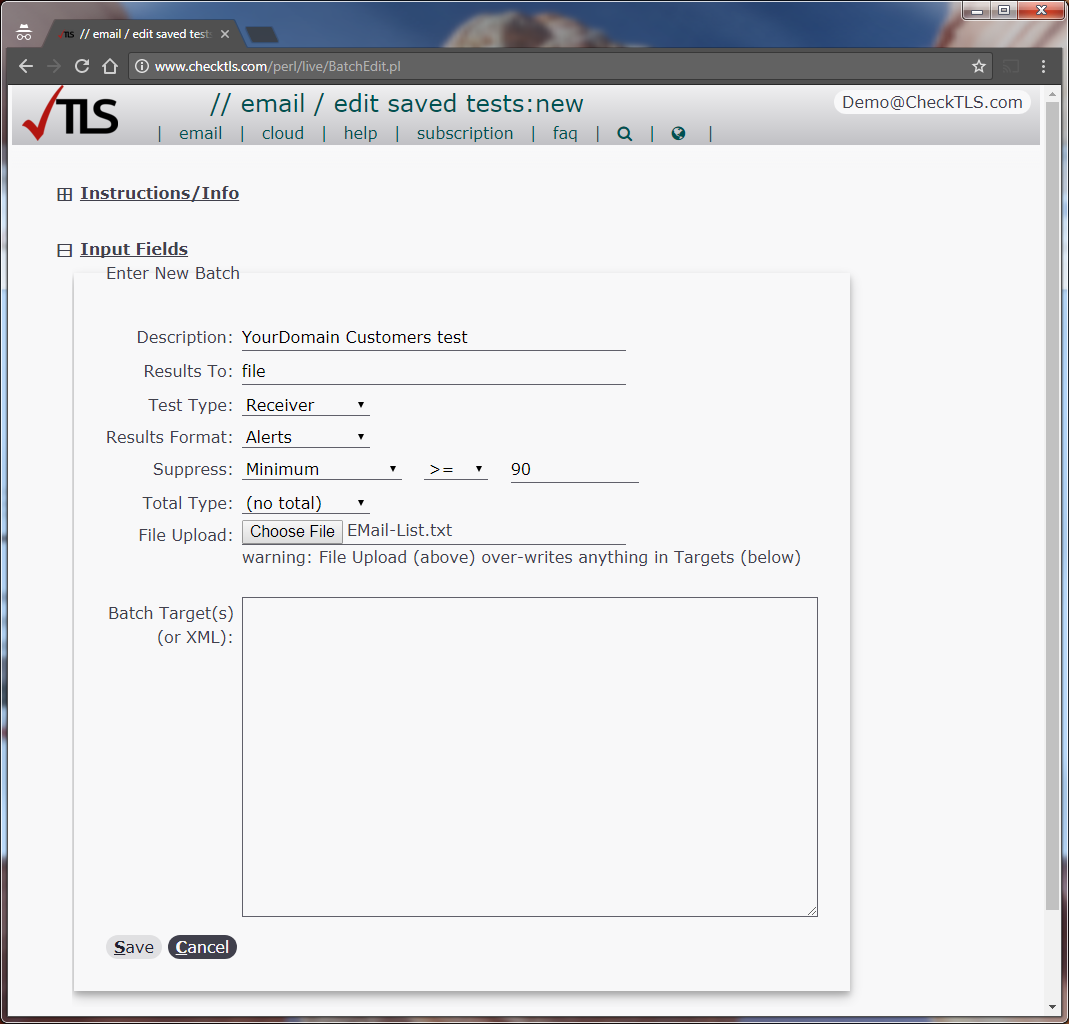
On the screen, enter the fields as below and then choose :
- Description
- Name this test "YourDomain Customers Test" (replacing "YourDomain" with your real domain name).
- Results To
- Use the word "file" (we will change this later after we test the Batch).
- Test Type
- This must be "Receiver".
- Results Format
- This must be "Alerts".
- Suppress
- This should be "Minimum" and ">=" (i.e. greater than or equal) and "90". See About Customer Scores below for more information.
- Total Type
- This must be "(no total") or you will receive duplicate alerts.
- File Upload
- Click and browse to the email list text file on your PC.
- Batch Target(s)
- Leave this empty.
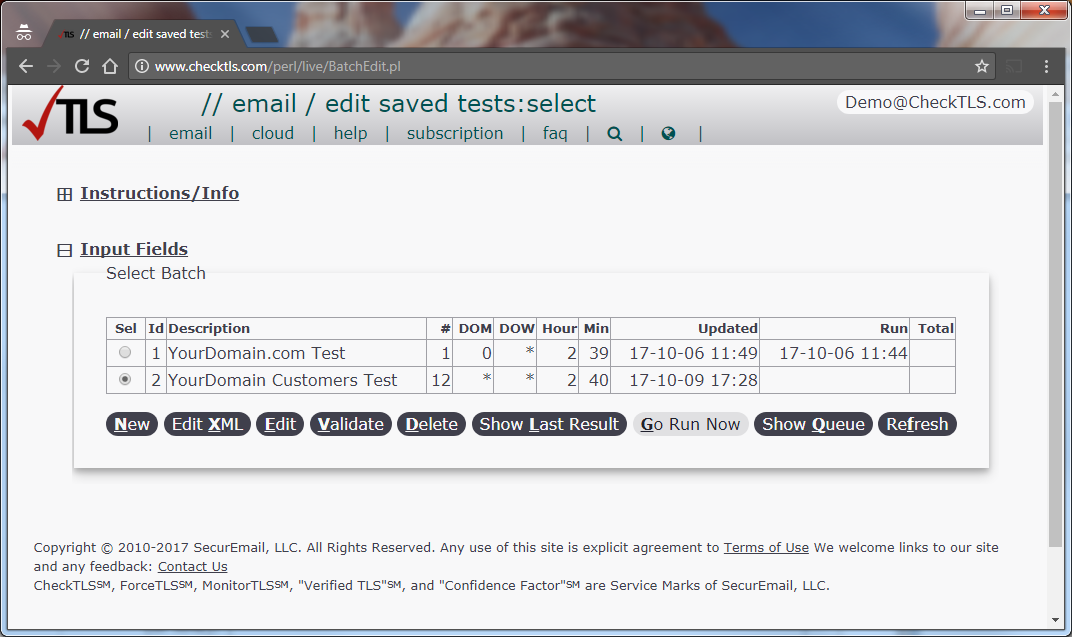
After saving the test you will return to the screen with a message in red that a new test was created. Choose to make sure you created the test correctly:

The screen should say "XML VALIDATES OK" as shown below. Don't worry about the "SCHEDULE DOES NOT VALIDATE" message right now. If not, delete the test and start over. See Validation Failed below for more information. Use to continue:
Try the test to see if it works. From the screen, choose :
The screen should redisplay with a message in red that your test is queued and when it should finish. Depending on how many targets are in your Batch, this could take a while. You can watch the Batch in process. Choose to see the results:
Use the on the screen to watch results come in. Look at each line to see which targets FAIL. Every one of these FAIL targets will generate a separate email to you, as it should. See About Customer Scores below for more information. Choose when the results finish.
Schedule the Batch Test to run regularly
The test has finished when, on the screen, the "Run" column (second from the right) changes to show the date/time the test finished. Choose to schedule the test to run regularly:
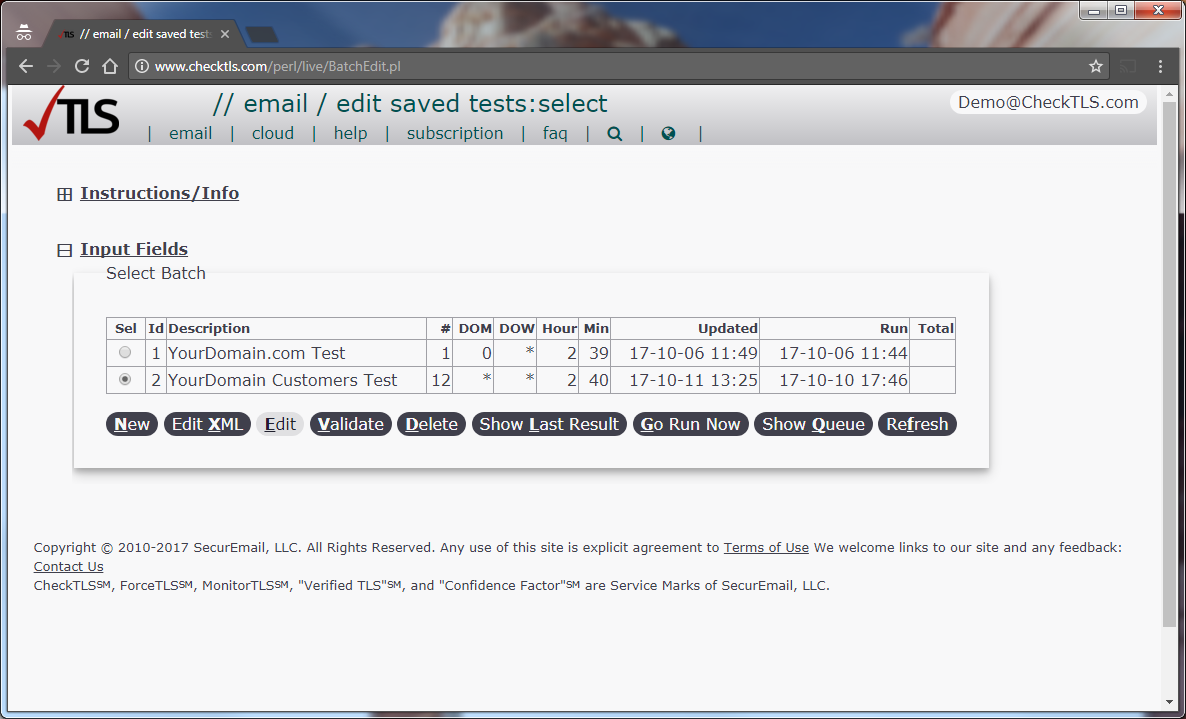
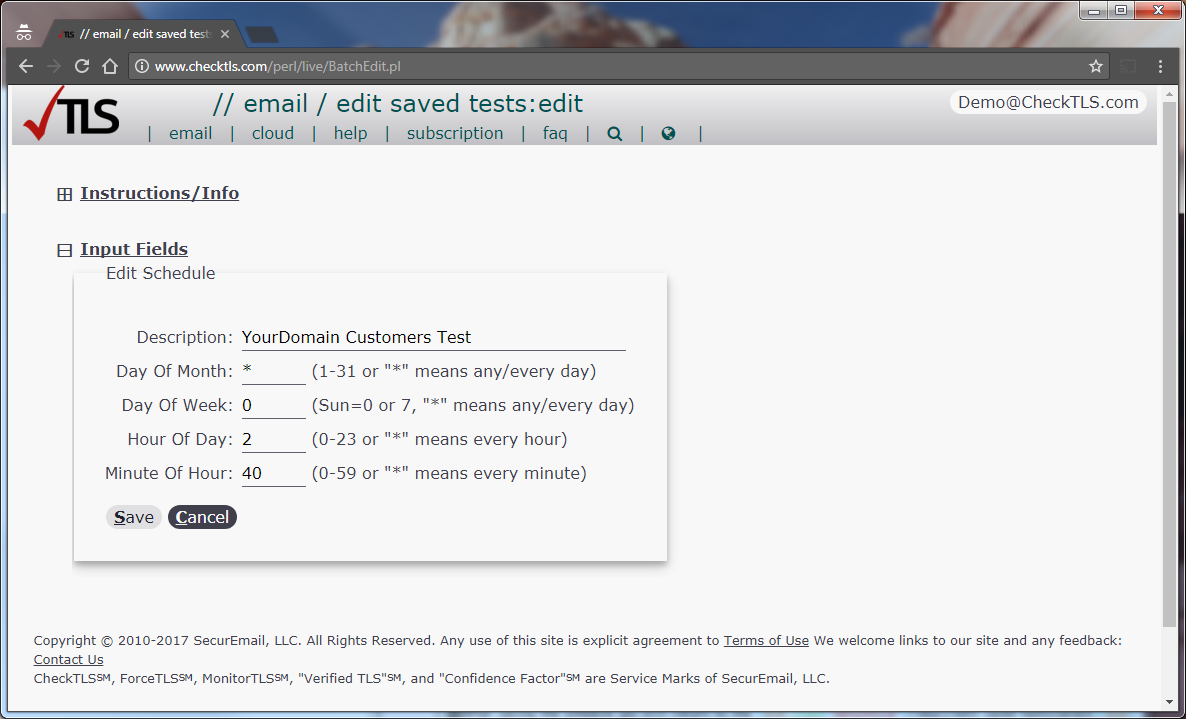
On the screen, enter the fields as below and then choose :
- Description
- Leave this as you entered before.
- Day Of Month
- Change this to an asterisk (meaning run the test any day).
- Day Of Week
- Change this to 0 (zero, meaning run the test every Sunday).
- Hour Of Day
- Pick an hour between 1 and 5.
- Minute Of Hour
- Pick a minute between 0 and 59.
After saving the schedule you will return to the screen with a message in red that the schedule was saved. Choose again to make sure you the test will run when you expect:
The screen should still say "XML VALIDATES OK", but it should also now say "SCHEDULE VALIDATES OK" as well, and it shows you when the test will next run. Use to continue:
That it. You have created a test of how your customers receive email and scheduled it to run every day.
Establish a process to keep the (customer list) Batch updated
How confident you are that PI you are sending via Internet email is safe depends on keeping an accurate list of the customers with whom you exchange PI.
One way to do this is to add a step to your new customer/client onboarding process that tests the customer's email before you start doing business with them. This is a good idea whether or not you are using CheckTLS to monitor email. Once you know their email is good, add them to the Batch at CheckTLS.
Another way is to re-build the list of your customer email addresses the same way you built it the first time, from your address book, your email server logs, your CRM, etc.
Or a combination, where your back office maintains a list of active customers, and your IT department periodically takes the list and uploads it into the Batch at CheckTLS.
Periodically audit the Batch Test source and result
It is very easy to verify that your two tests are working. And to verify that your, and your customers', emails are secure. Simply changing the output format of the two tests from "alert" to "detail" causes them to produce all the details that go into a score: DNS names, MX hosts, software, certificates, CAs, encryption, other SSL info, etc.
Your company's risk tolerance should determine how often you run the detail and how closely you review it. In any case we recommend archiving the detail for some time as it's a very easy way to demonstrate your commitment to email security.
Documentation for how to specify the Format, Results To, and minimum Score is available on the various screens of , and in the About Batch and BatchEdit documents.
Briefly, you use the button on the screen to make the highlighted changes in the Batch XML Input File:
<BatchTest TestType="thru">
    <Target>CheckTLS-Reply@YourDomain.com</Target>
    <Delivery>
        <To>You@YourDomain.com</To>
        <Format>alerts</Format>
        <Suppress Function="minimum" Test="ge" Value="100" />
    </Delivery>
</BatchTest>
<BatchTest TestType="thru">
    <Target>CheckTLS-Reply@YourDomain.com</Target>
    <Delivery>
        <To>You@YourDomain.com</To>
        <Format>detail</Format>
        <Suppress Function="minimum" Test="ge" Value="999" />
    </Delivery>
</BatchTest>
This is the source XML for the first test created in this how-to; the one that tests your email system. The change to <Format> is obvious, the change to <Value> causes the Suppress to be false, meaning it will always send the results.
Results Format
Should your email, or one of your customer's emails, fail, the tests will send an email to the address that you specified in the "Results To" field. This email is very simple so you can read it on any size device, or more likely, have it sent to an automation that parses it and opens a ticket or turns a light red in your Network Operations Center. Here is an example:
From:   ReplyAddress@TestThru.CheckTLS.com
Sent:   Thursday, October 12, 2017 4:56 PM
To:     You@YourDomain.com
Subject: ALERT: CheckTLS-Reply@RefuseTLS.CheckTLS.com(50) FAIL (50 not>= 100)

ALERT: CheckTLS-Reply@RefuseTLS.CheckTLS.com(50) FAIL (50 not>= 100)
About Customer Scores
We used a score of 90 in the "Monitoring Your Customers' Email" Batch Test above. This is a very subjective number (see the FAQ Why Do You "Score" TLS Instead of Giving a Yes or No Answer? for more info), and we suggest you research your list of customer emails to decide on the best number for your situation.
Depending on how and what you test, a completely correct email system will score 90 or more, and that should be everyone's goal. When you have customers that score less than 90, you must decide if the risk of a less-than-perfect score pose enough risk to your organization that you cannot use email to communicate Protected Information (PI) with them. CheckTLS's can help you find what the deficiencies are in a customer's email system and help you weigh the risk.
Most CheckTLS subscribers have more than one Customer Email Batch. Each Batch has a different minimum score, so the very secure customers are in a Batch that requires a score of 100 or more, most customers are in a Batch that requires a 90, and a few customers they are comfortable with deficiencies are in a Batch that requires 70 or so.
The periodic audit of the results of these Batch Tests will alert you to changes within customer email systems, allowing you to react appropriately.
See the Better Monitoring section below for what to do if this simple monitoring is resulting in too many emails. CheckTLS has other tools that can help.
Fixing Problems
Validation Failed
The section under "Batch Results" on the screen may help identify what went wrong. It shows which line(s) of the XML source code for the test have errors. The Batch XML Input File documentation describes the XML in detail. However, as mentioned above, it may be easier to just recreate the test rather than edit the XML.
Forwarder Failed
To test the Custom Forwarder that you setup, try changing it to forward to an address you have outside your domain, like at gmail, Yahoo mail, iCloud, Outlook.com, etc. Send an email from that outside address to your Custom Forwarder and see if it comes back.
Better Monitoring
CheckTLS has more sophisticated monitoring capabilities than the simple "send an email on failure" monitoring described in this how-to. If you find or expect that the monitoring described in this how-to results in too many emails, or a flood of emails when just one things breaks, or you want more control over deciding what constitutes failure, or degrees of failure, we can help.
More capabilities means more complexity. The above how-to is an excellent overview of the capabilities of CheckTLS. To get more out of CheckTLS does require an investment in learning our tools. Start with for an overview of what tools do what. See for an introduction to Batch tests, and for more in depth documentation on our monitoring capabilities.